Get Started with Clea 2.0
This guide takes you from receiving your device to connecting it to Clea 2.0 for the first time. You will prepare the hardware, access your Clea account, register the device, apply its configuration, and check that it is online.
Your setup is complete when the device appears as Online in Clea 2.0 Device Manager.
Choose your onboarding path
Select the setup that matches the operating system installed on the device you want to connect, not the computer used to access Clea. First, review the prerequisites.
| Your device | Where to start |
|---|---|
| Clea OS with a display, such as Evaluation kit Modular Vision 10.1" | Prepare and power on the kit, then register with One Agent and download the configuration on the device |
| Clea OS headless, such as a SMARC board used without a display | Connect a headless device |
| Linux without Clea OS, on SECO or third-party hardware | Connect your own Linux device |
| Windows 64-bit without Clea OS | Connect a Windows device |
| Clea OS, manual configuration preferred | Manual configuration |
Already completed provisioning? Verify that your device is online.
Choose your device
The following Evaluation Kits have been selected for Clea 2.0 evaluation:
- Evaluation kit Modular Vision 10.1", with an integrated 10.1-inch display and power supply.
- Evaluation kit SMARC with E71, with a Carrier E71, SMARC QCS6490 module, power supply, and heatsink. You can access it through a terminal or connect compatible external peripherals.
A compatible debug cable is required for operations that involve accessing the device through its serial console, such as headless setup or troubleshooting. Refer to the Evaluation Kit hardware documentation to identify the correct cable and connection.
These are not the only compatible SECO products. All SECO products running Clea OS can be connected to Clea. The steps depend on the operating system, hardware architecture, and available interfaces of your particular device.
Before you begin
Make sure you have:
- A device with its required power supply, and any necessary network, display, keyboard, or other peripherals.
- An internet connection for the device, through Ethernet or a supported network interface.
- A Clea account, activated through the Free Trial or a commercial subscription. If you do not have one, visit clea.ai.
- Access to a Clea instance and tenant, with permission to register a device.
- The technical documentation for your specific hardware, particularly the operating system image, architecture, power connections, and network interfaces.
If your Evaluation Kit package contains a flyer or QR code, follow its instructions to reach the onboarding resources. Keep your Clea login details available during setup.
Key terms: instance, tenant, device alias and Device ID
An instance is your Clea platform environment. A tenant is the workspace in which devices are registered. A device alias is a readable name that helps you identify a device, while the Device ID is its technical identity in the platform.
1. Prepare and power on your Evaluation Kit
Follow these steps for a Clea OS Evaluation Kit with a display, such as Evaluation kit Modular Vision 10.1" or Evaluation kit SMARC with E71 connected to external peripherals.
- Unbox the kit. Check the contents against the hardware documentation for your product.
- Connect the required peripherals. Use the Modular Vision integrated display or connect a compatible display, keyboard and mouse to the SMARC evaluation kit. Refer to the product documentation for connector locations and assembly instructions.
- Connect Ethernet if available. Connect the device to a network with internet access. If using Wi-Fi instead, complete the optional Wi-Fi steps below after startup.
- Power on the device. Connect the appropriate power supply and wait for Clea OS to complete startup.
- Open the desktop. If the Out-of-the-Box Experience (OOBE) opens automatically in Chromium, select Settings using the gear icon and then Exit. Some images open directly to the Clea OS desktop.
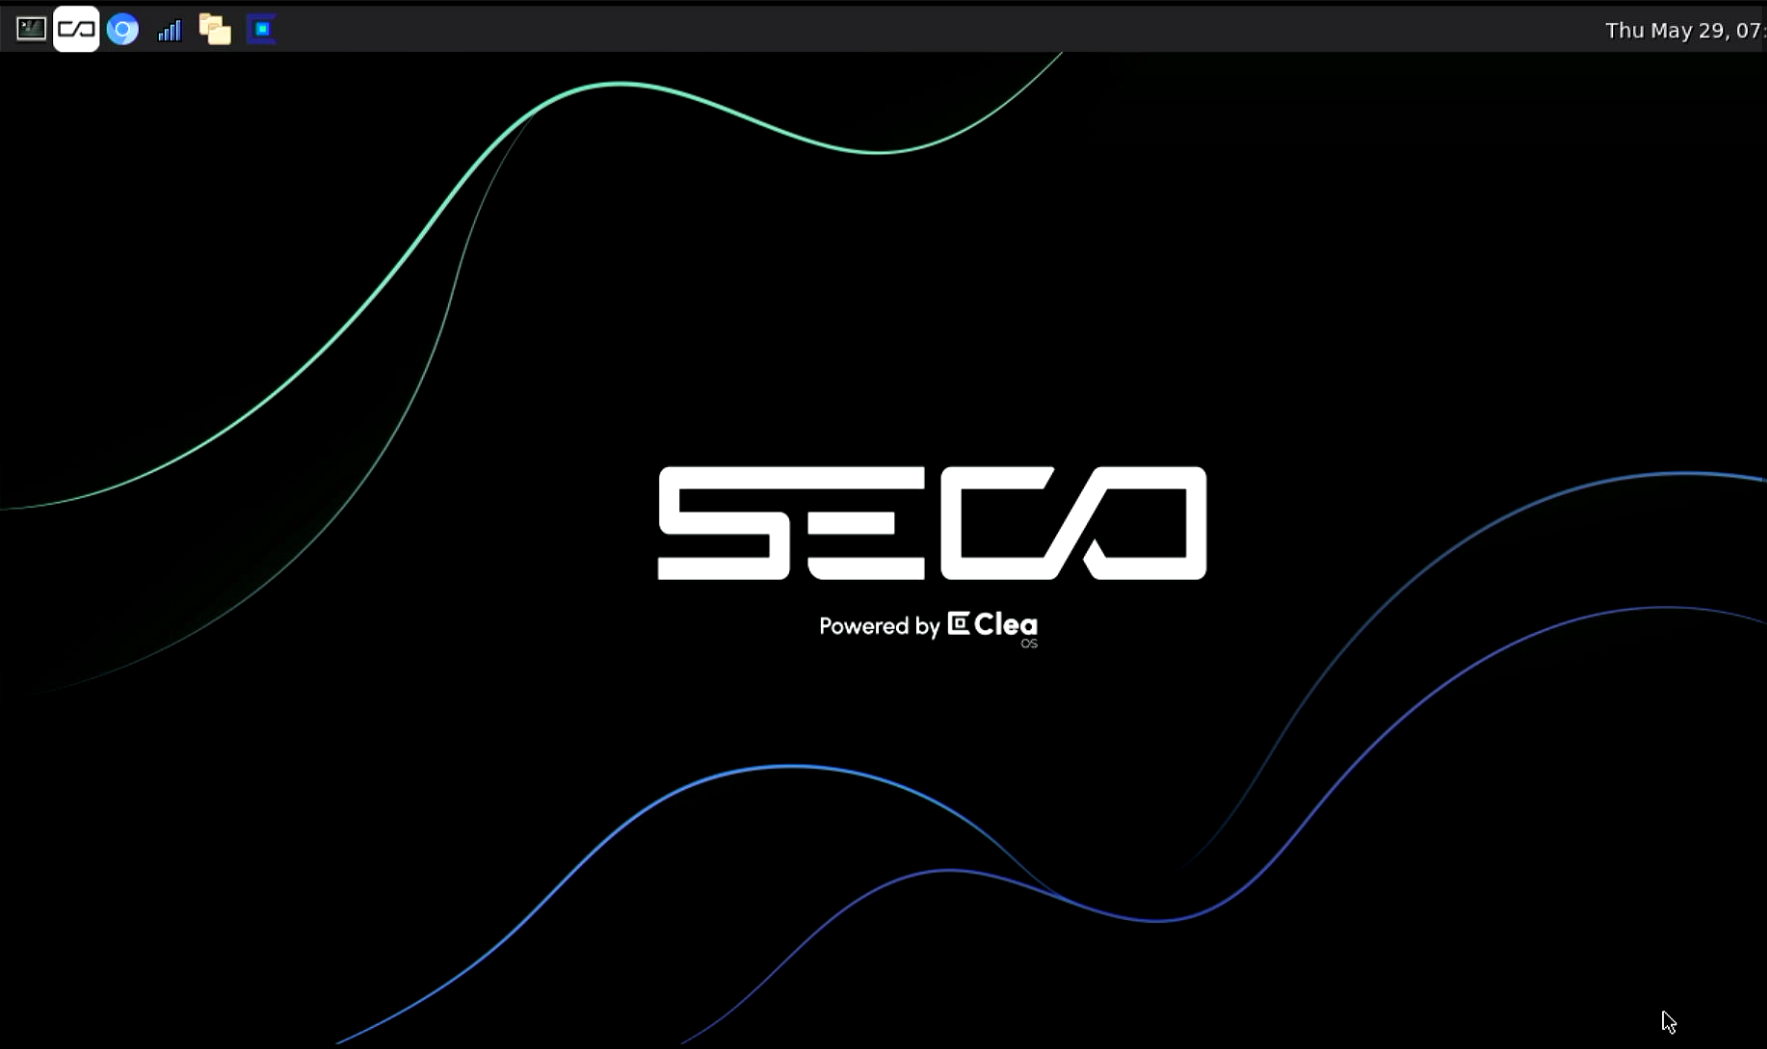
Connecting Modular Vision to Wi-Fi (optional)
Use these instructions if your Clea OS image provides the iwgui wireless-network interface and the device has a supported Wi-Fi adapter.
- From the top panel, open the network menu. In iwgui, select the wireless interface (for example,
wlan0) and make sure Station mode is selected.
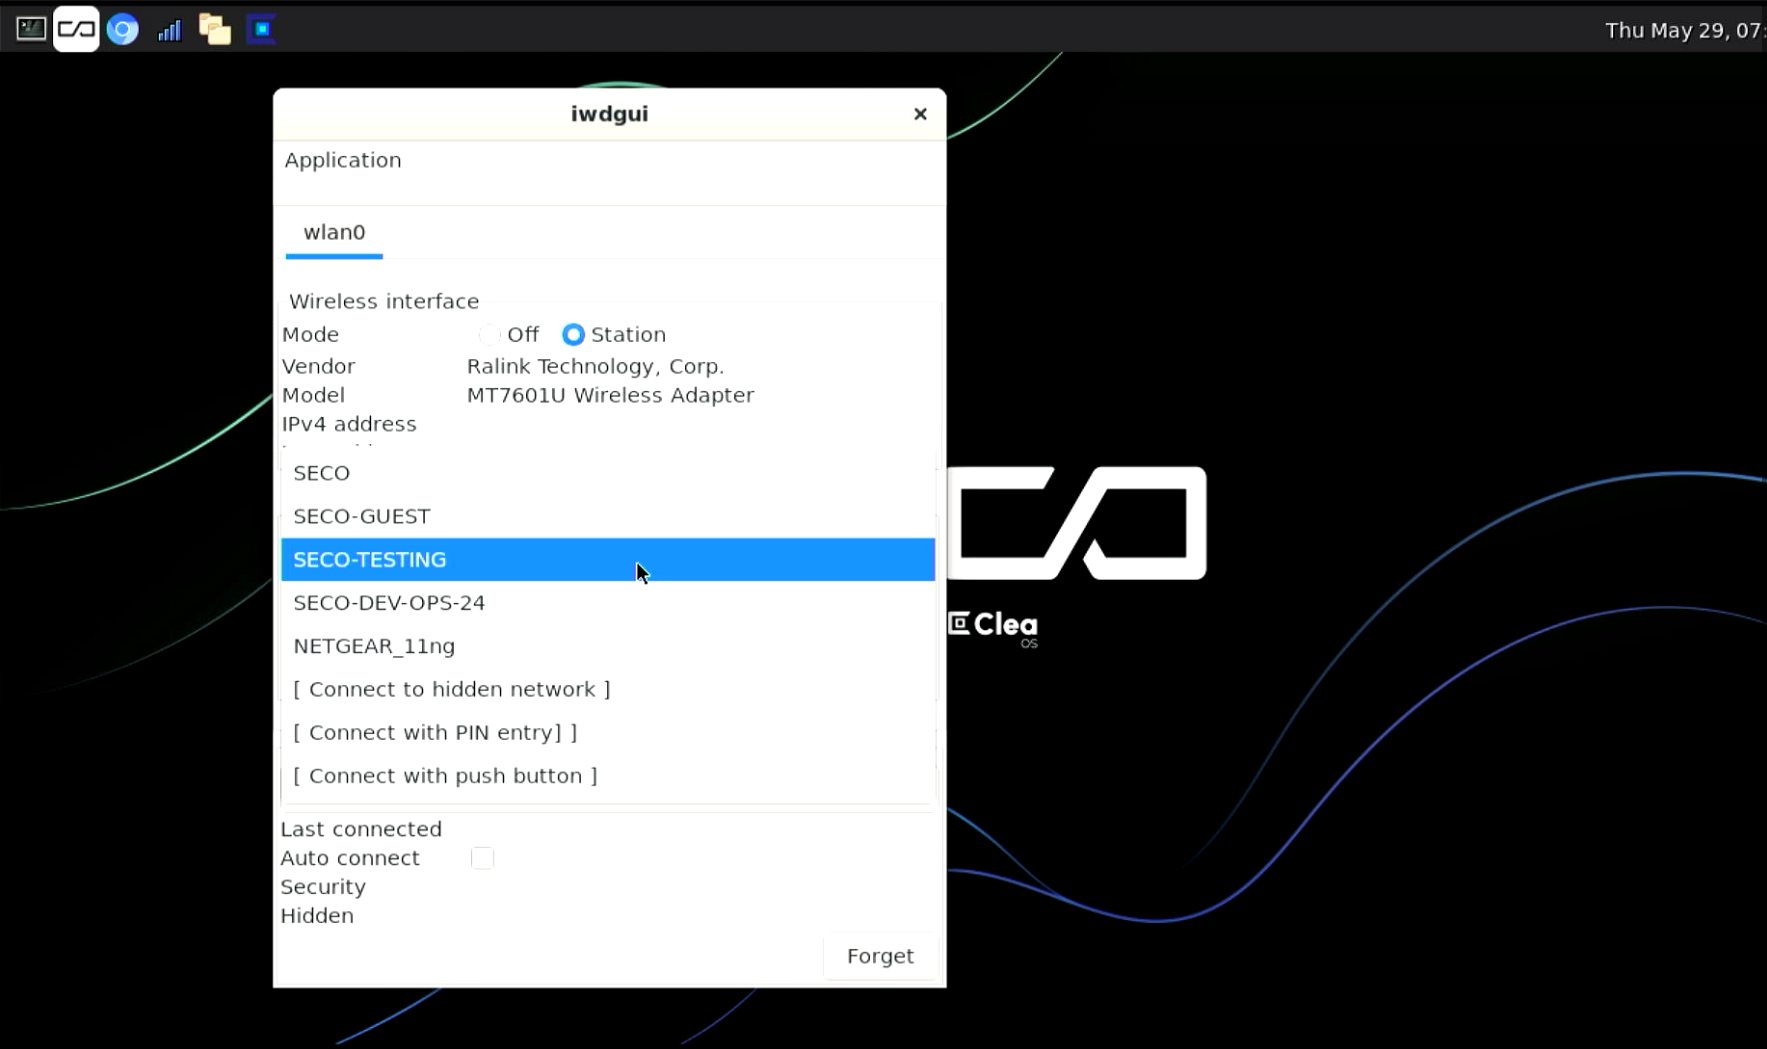
- In the available network list, select the Wi-Fi network you want the device to join.
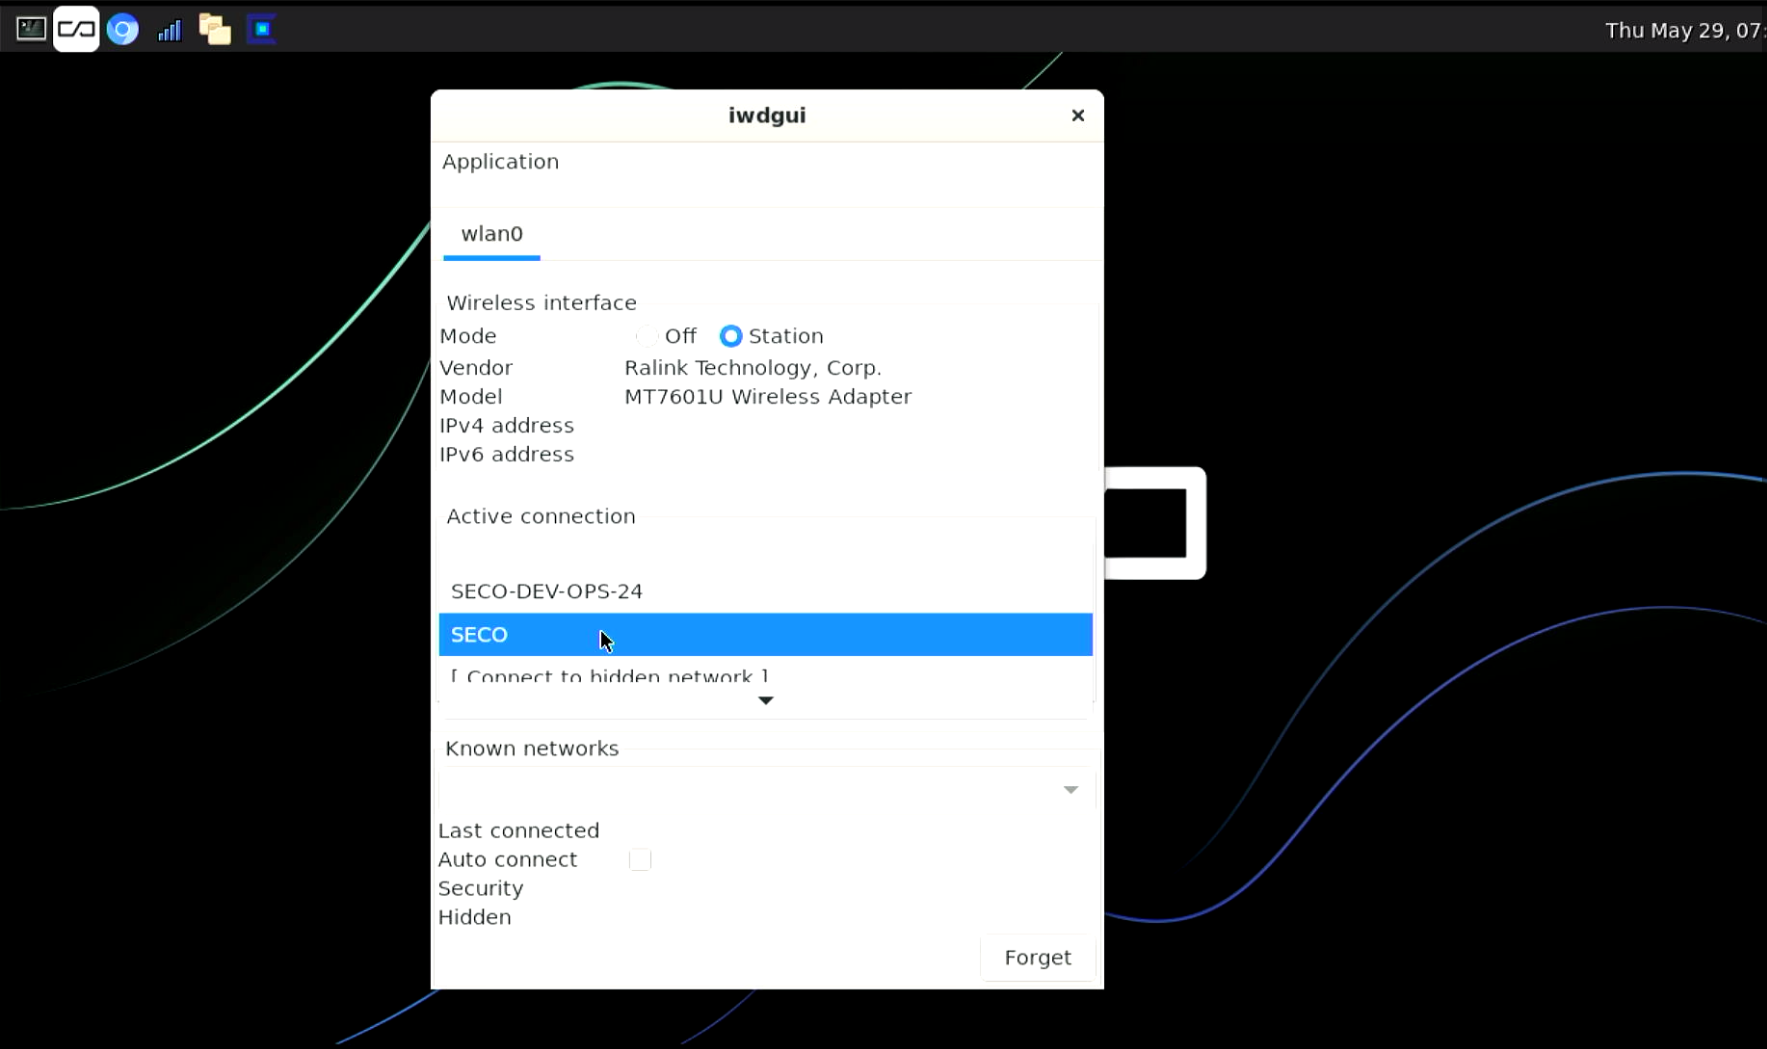
- If prompted, enter the network Passphrase and select OK.
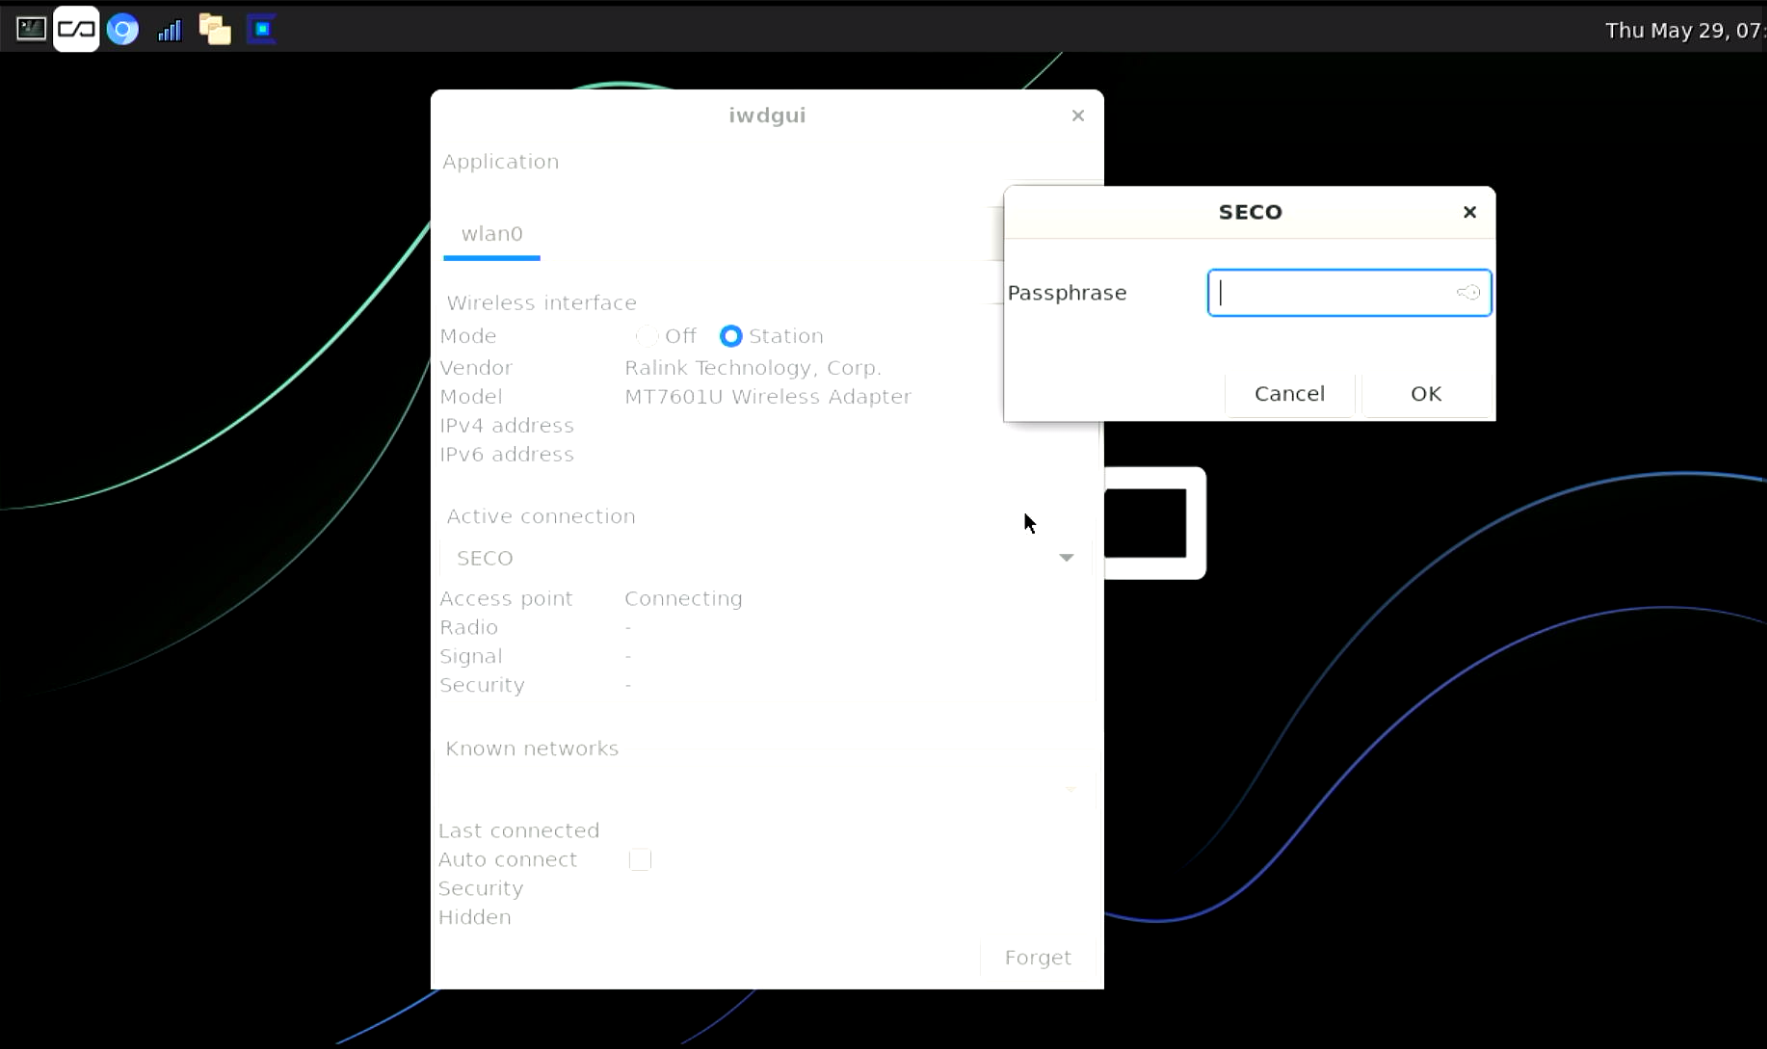
- Check that the connection becomes active and, where shown, that the interface receives an IP address. The SSIDs visible in the screenshots are examples; choose your own network.
If you are using a device without a display, you can skip the graphical OOBE and Wi-Fi steps and follow Connect a headless device.
2. Sign in to Clea 2.0
If you are working directly on a device with the graphical Clea OS interface:
- On the desktop, select the Clea icon to open Clea 2.0 in Chromium.
- Sign in using the credentials for your Clea account.
- Select your assigned instance and tenant if prompted.
- After signing in, open the Overview page.
You can also access your Clea instance from a browser on another computer. This is useful for headless devices and for devices running a different operating system. The registration steps remain the same, but the way you apply the configuration to your device may differ.
3. Register your device with One Agent
In the left navigation menu, open Provisioning > One Agent.
The One Agent Provisioning Wizard guides you through four progress stages: Target OS, Architecture, Registration, and Bundle & Install. In the main panel, these appear as Select Target Operating System, Choose Architecture, Device ID Generation & Astarte Registration, and Binary Bundle & Installation Package.
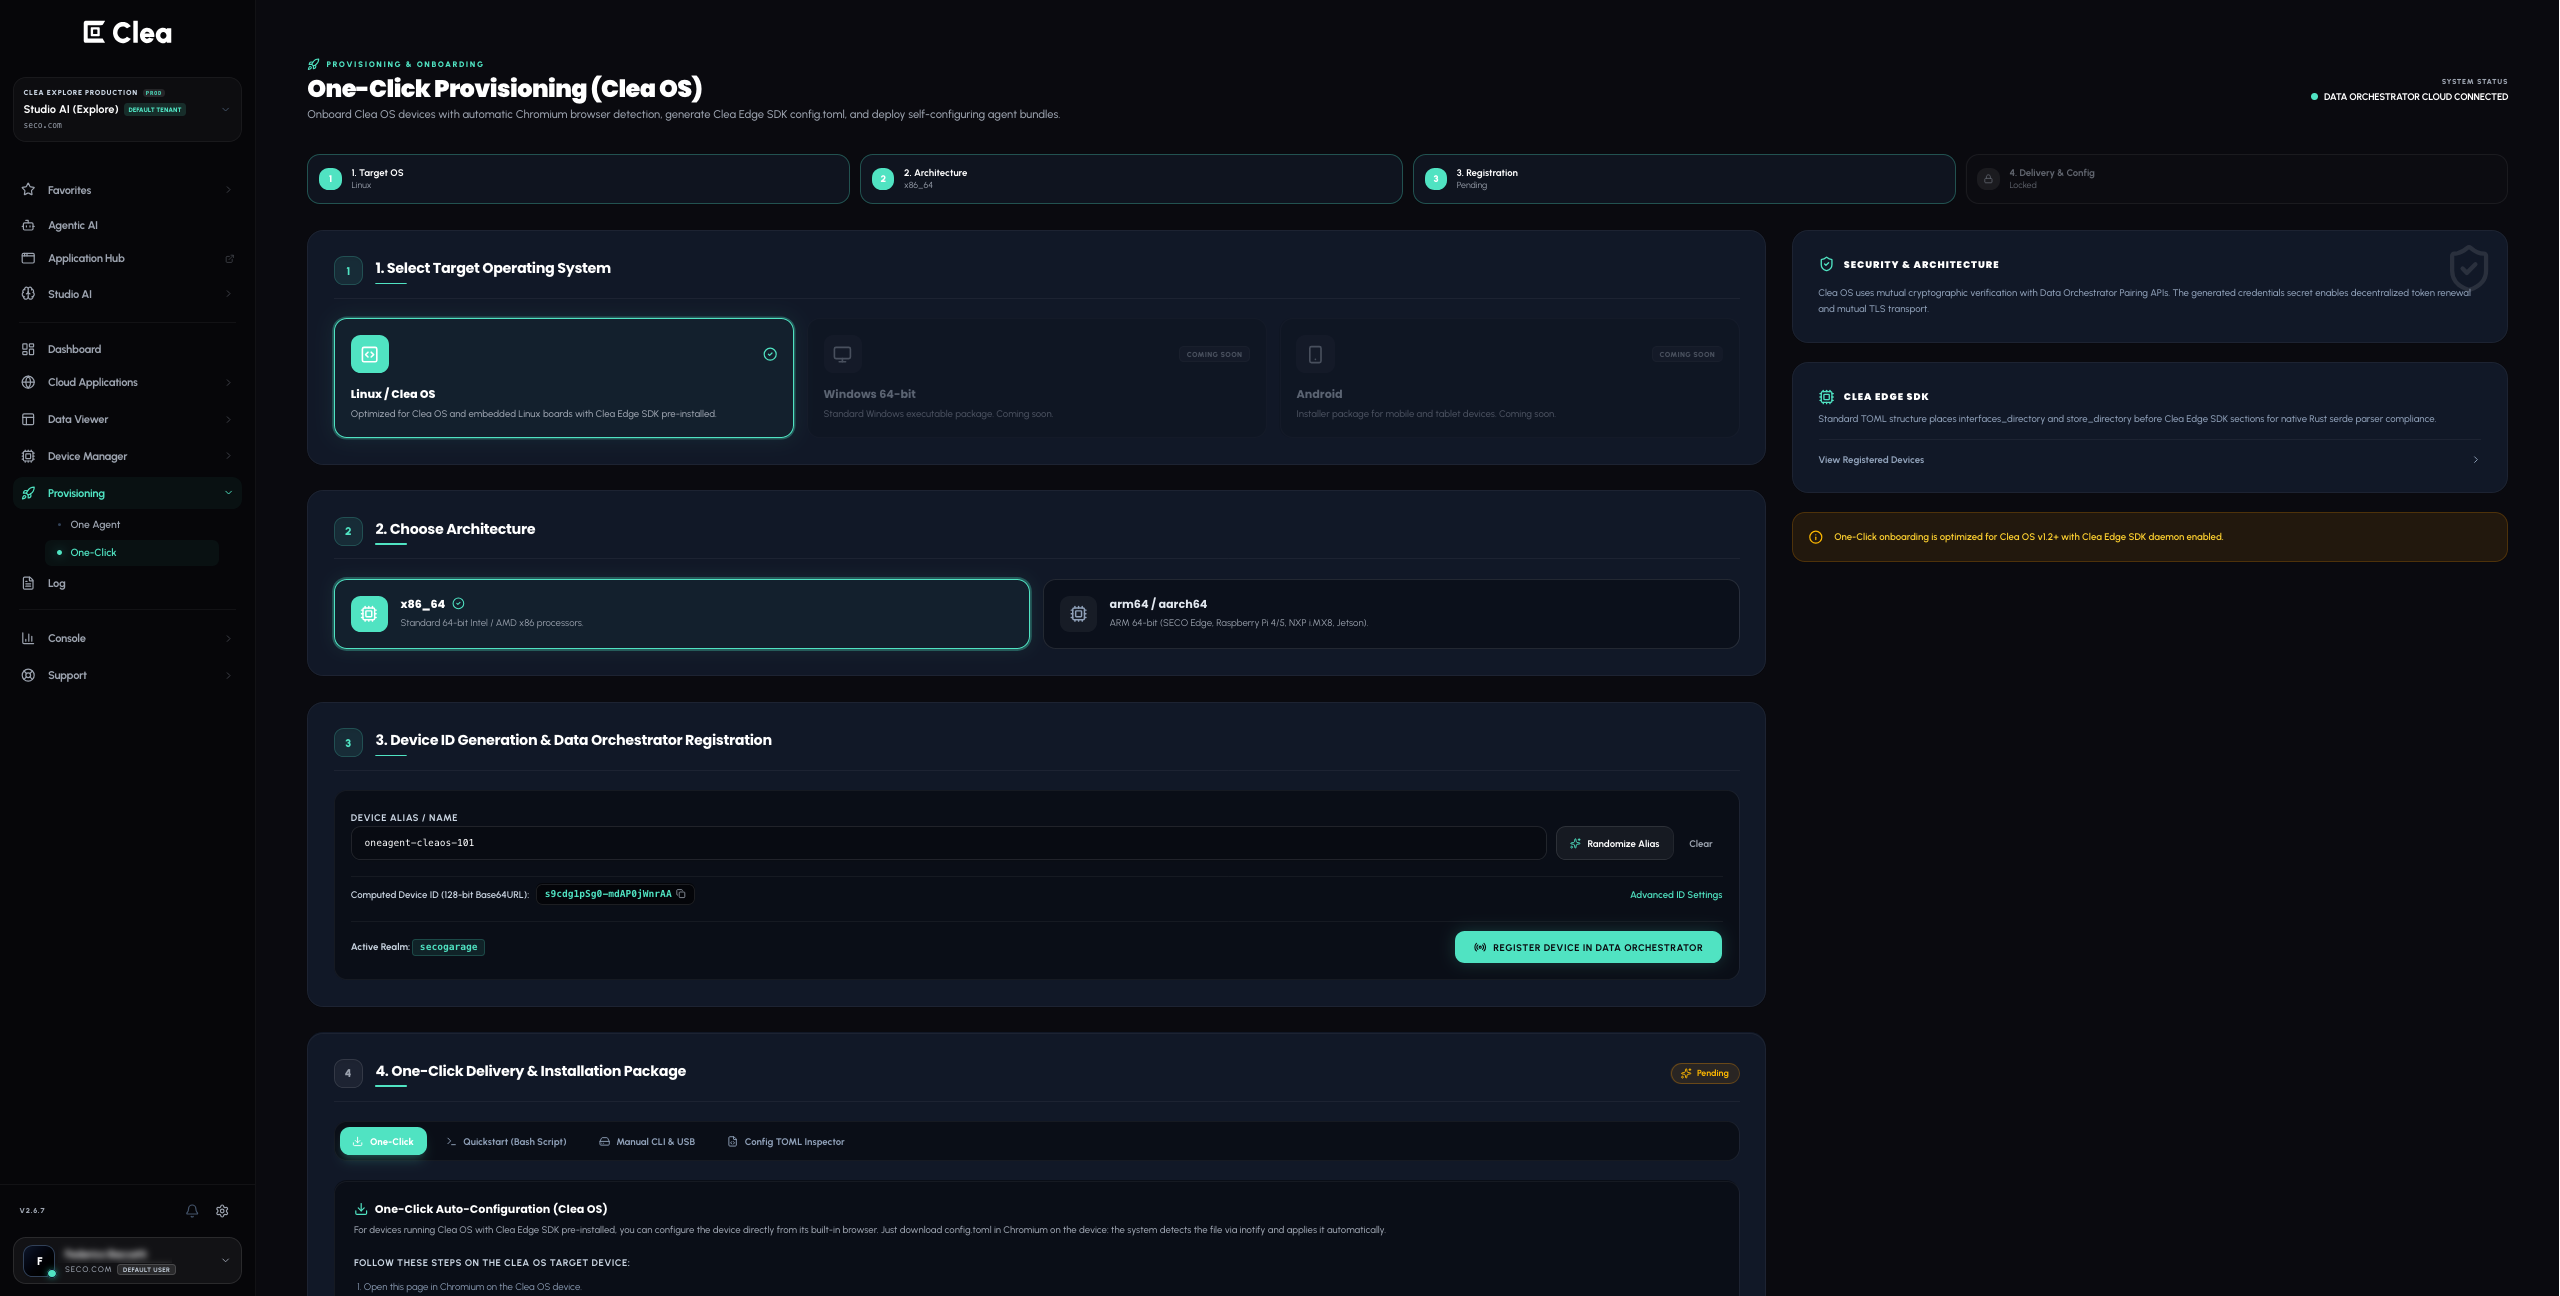
For the Evaluation Kits described above, choose arm64 / aarch64, even if the example screen shows another architecture.
3.1. Select Target Operating System
Select the operating system installed on the device you want to connect, not the operating system on the computer you are using to access Clea.
- Select Linux for a device running Clea OS or another supported Linux distribution.
- Select Windows 64-bit for a compatible Windows device.
3.2. Choose Architecture
For Linux devices, select the architecture that matches the target processor:
- arm64 / aarch64 for 64-bit ARM-based hardware.
- x86_64 for 64-bit Intel or AMD-based hardware.
Both selected Evaluation Kit configurations use Qualcomm QCS processors and require the arm64 / aarch64 option. If you are using another SECO configuration, check the processor architecture in its product specifications. For Windows 64-bit, the architecture is set to x86_64.
3.3. Enter the Device Alias / Name
- In Device Alias / Name, enter an easily recognizable name, such as
evaluation-kit-01orfactory-gateway-01. You can also use Randomize Alias. - Check the Computed Astarte Device ID displayed below the name. The Advanced ID Settings link is also available in this section.
- Check the displayed Realm, which identifies the destination environment for device registration. If you have access to multiple environments, make sure you are working in the intended tenant.
3.4. Register the device
- Select Register Device in Astarte.
- Wait until the Registration stage changes to Registered. The Binary Bundle & Installation Package section displays Device Registered.
- Continue to Bundle & Install, now marked Ready to Download. After registration, the registration button is labeled Re-register Device in Astarte; you do not need to select it to continue.
Registration creates the device identity in Clea. The physical device will appear online only after it receives and applies the necessary provisioning configuration.
4. Install or apply the device configuration
Under 4. Binary Bundle & Installation Package (the Bundle & Install stage), choose the method that fits your device:
- Clea OS with a display: download the configuration directly on the device.
- Clea OS with supported USB import: use a USB drive when working from another computer.
- Linux with terminal access: use Quickstart.
- Existing
cleactlinstallation: use Manual CLI.
4A. Download the configuration directly on a Clea OS device
Use this method if you are on a device with Clea OS installed, such as one of the SECO Evaluation Kits, and are accessing Clea 2.0 directly from that device.
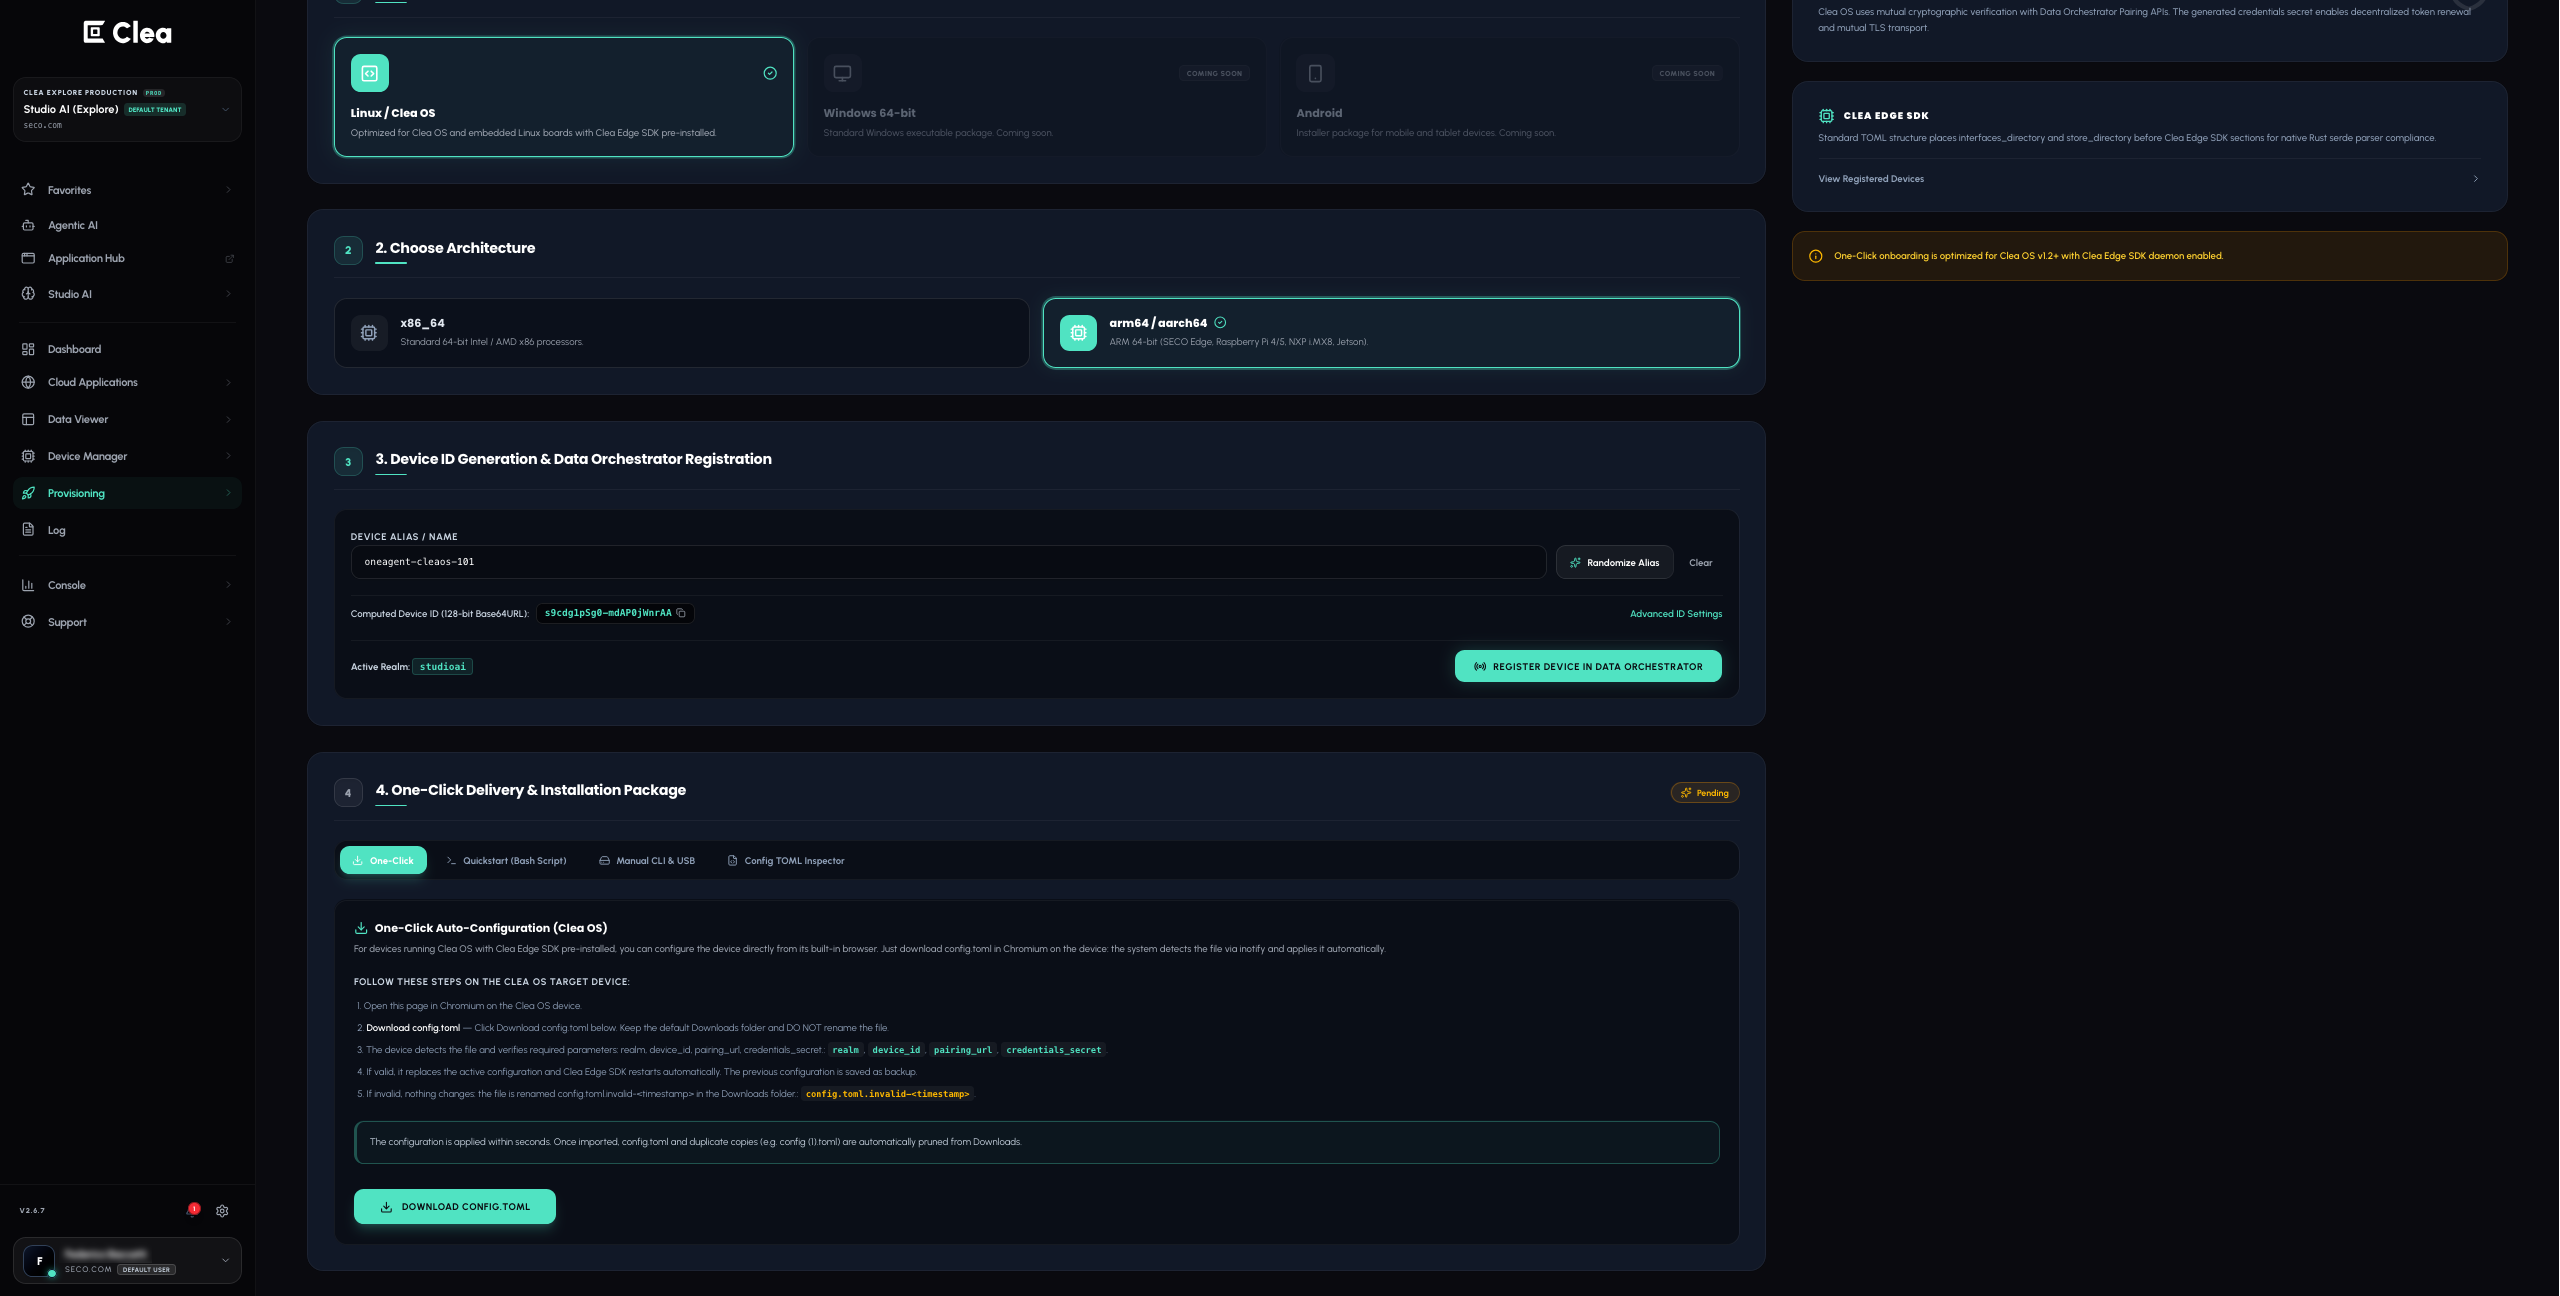
- In Binary Bundle & Installation Package, select One-Click Auto-Configuration. The panel is titled USB Auto-Configuration (Clea OS).
- Select Download config.toml.
- Allow Chromium to save the configuration file to the device's Downloads folder.
- On Clea OS images with automatic configuration import, the local provisioning service detects the downloaded file and applies the pairing settings.
- Return to Clea 2.0, open Device Manager, and check the status of the registered device.
With this method, the provisioning service processes the downloaded configuration locally. You do not need to copy credentials or edit system files manually.
Note: Automatic configuration import requires a Clea OS image with the corresponding provisioning service. On systems without this integration, use another method described below.
4B. Use a USB drive to transfer the configuration
Use this method when you access Clea 2.0 from a separate computer and the target Clea OS image supports configuration import from USB.
- Register your device in Provisioning > One Agent.
- In Bundle & Install, select One-Click Auto-Configuration and download
config.tomlto your computer. - Prepare a USB drive using a filesystem supported by the target image, such as FAT32 or ext4.
- Copy
config.tomlto the root directory of the USB drive. - Insert the USB drive into the Clea OS device.
- If the device displays a confirmation prompt for importing the configuration, approve it.
- Return to Clea 2.0 and confirm that the device is Online in Device Manager.
The USB import process depends on the features included in the installed Clea OS image. If your device does not support automatic USB import, use the Linux Quickstart method or configure the connection services manually.
Keep config.toml secure. It contains device-specific connection information and may include sensitive credentials. Do not reuse a configuration file to register a different physical device.
4C. Use Quickstart from a Linux terminal
Use this method when you can open a terminal on the target Linux device, including a headless board or another Linux system without Clea OS.
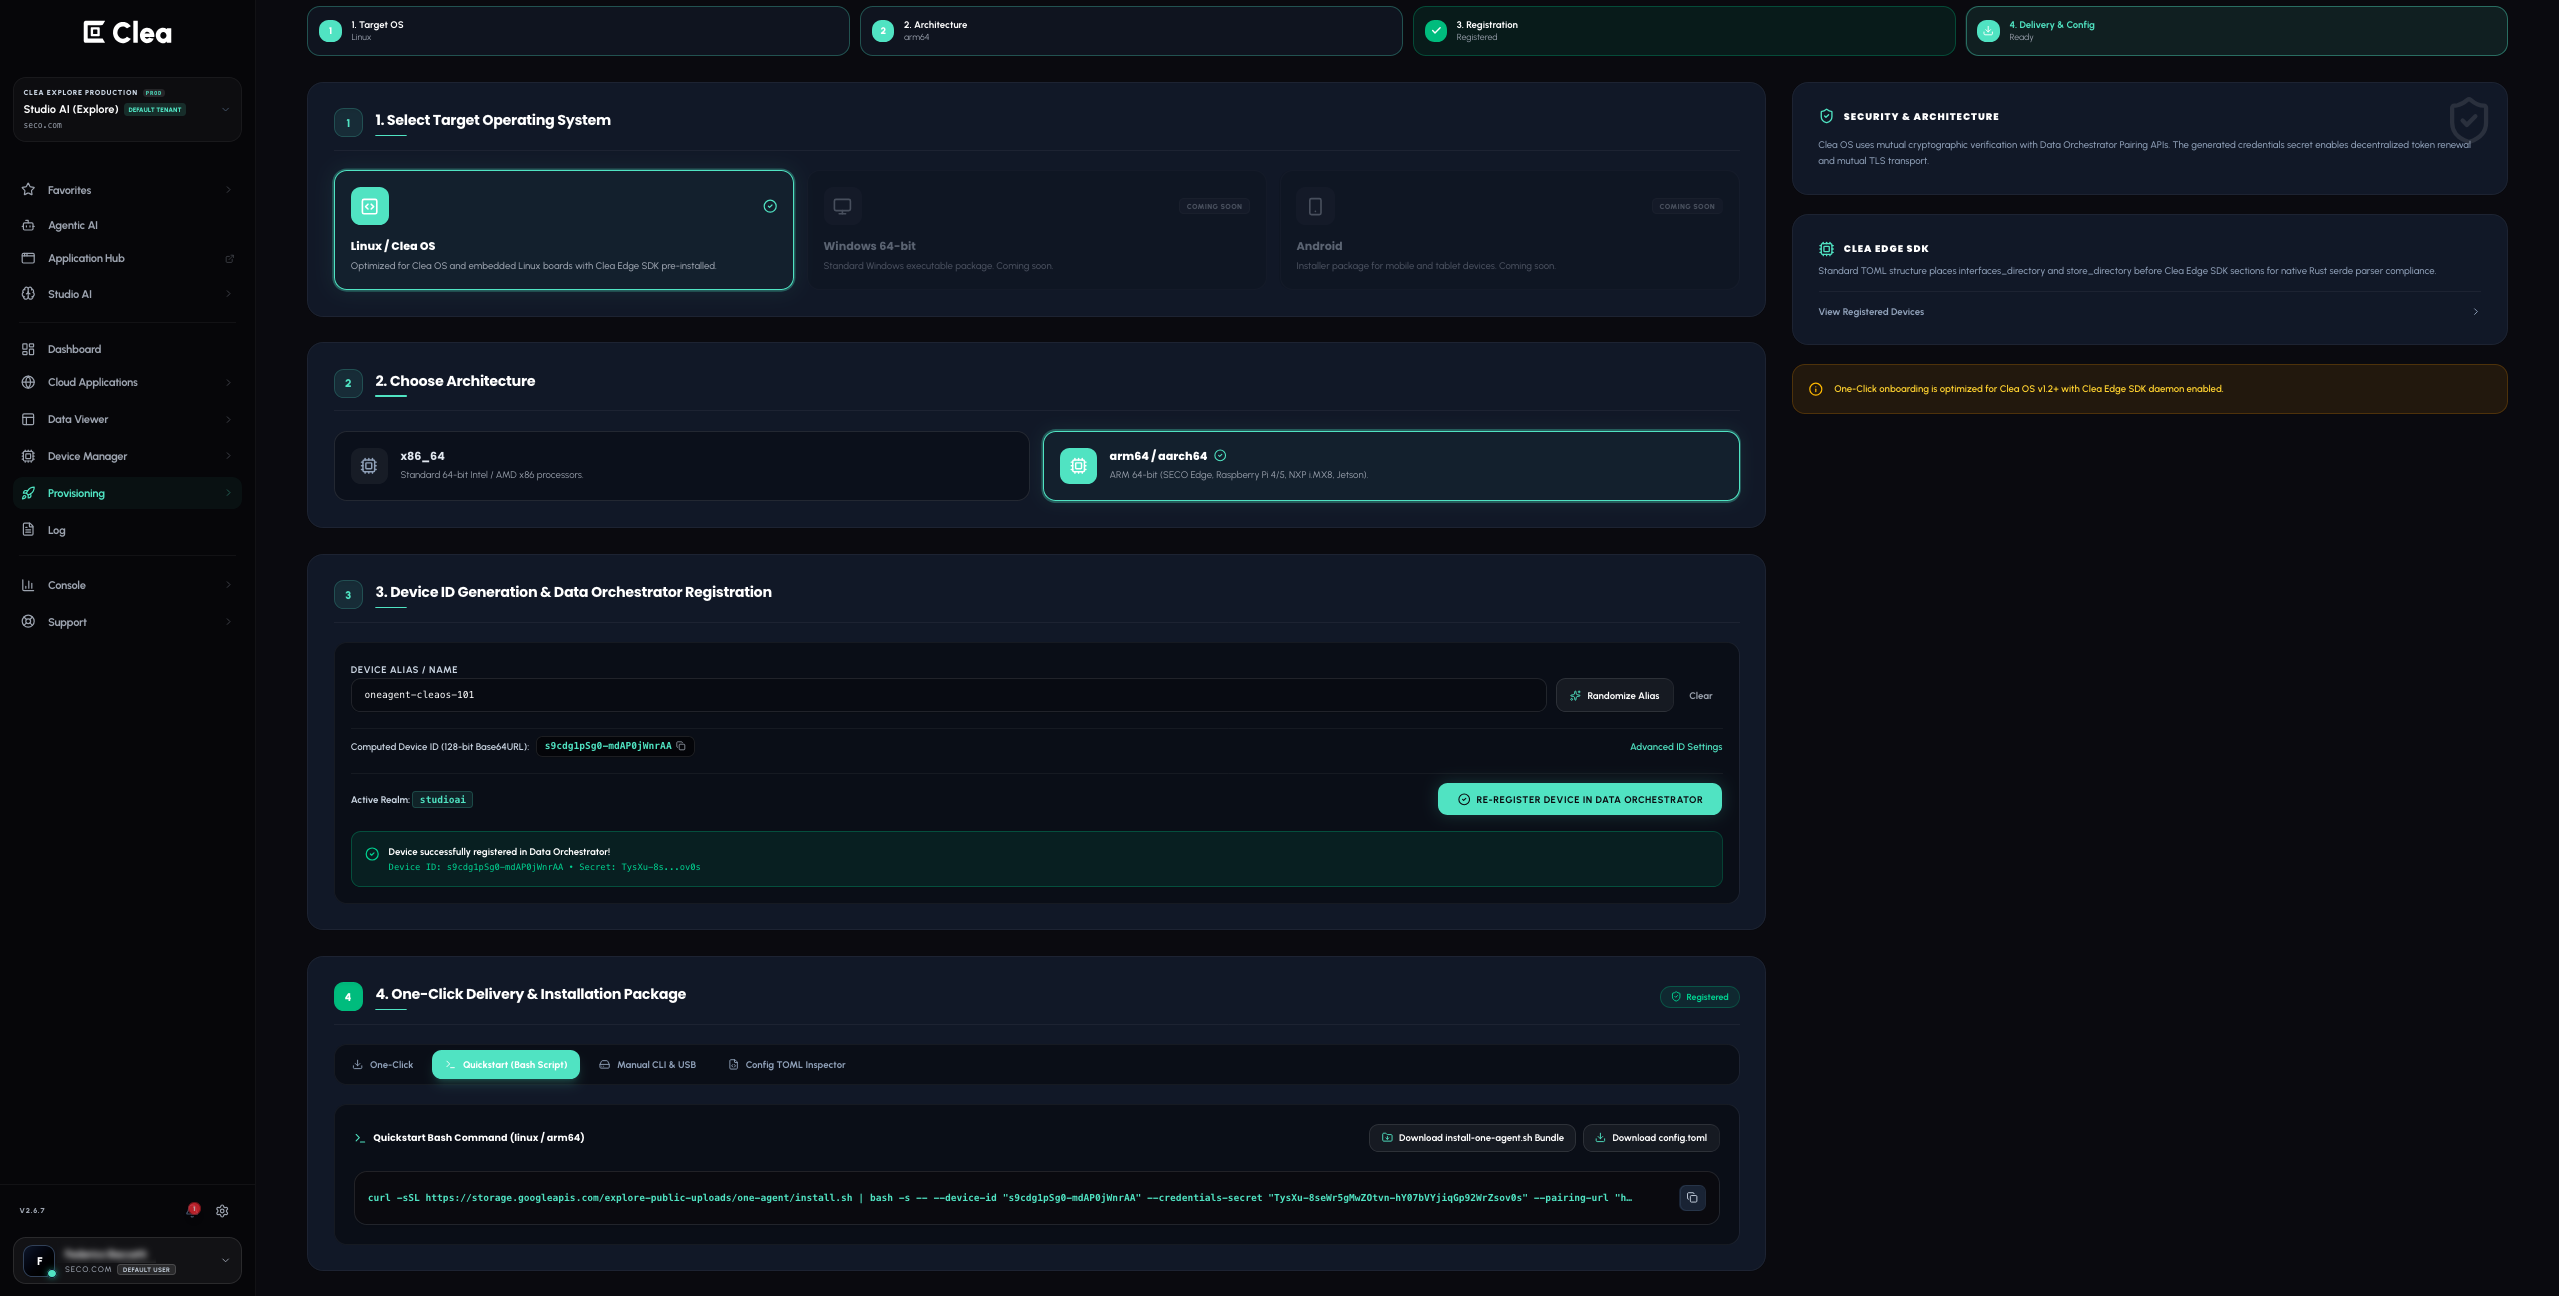
- Sign in to Clea 2.0 and open Provisioning > One Agent.
- Select Linux, choose the correct architecture, enter a device alias, and register the device.
- In Bundle & Install, select Quickstart.
- Copy the command under Quickstart Installation Command. It retrieves and runs the One Agent installation script. You can also select Download install-one-agent.sh Bundle if you prefer the downloadable bundle.
- Open a terminal on the device you want to connect. For a headless board, use its serial console or an SSH session.
- Paste and execute the command from Clea. Follow any instructions displayed in the terminal.
- When the installation finishes, return to Device Manager and check that the device is Online.
The command contains parameters specific to the registered device and tenant. Always use the command generated for that registration, and run it on the intended target device rather than on your development computer.
4D. Use Manual CLI with an existing installation
Use Manual CLI if the compatible cleactl command-line tool is already installed on the target device. The panel is titled Manual Installation via cleactl.
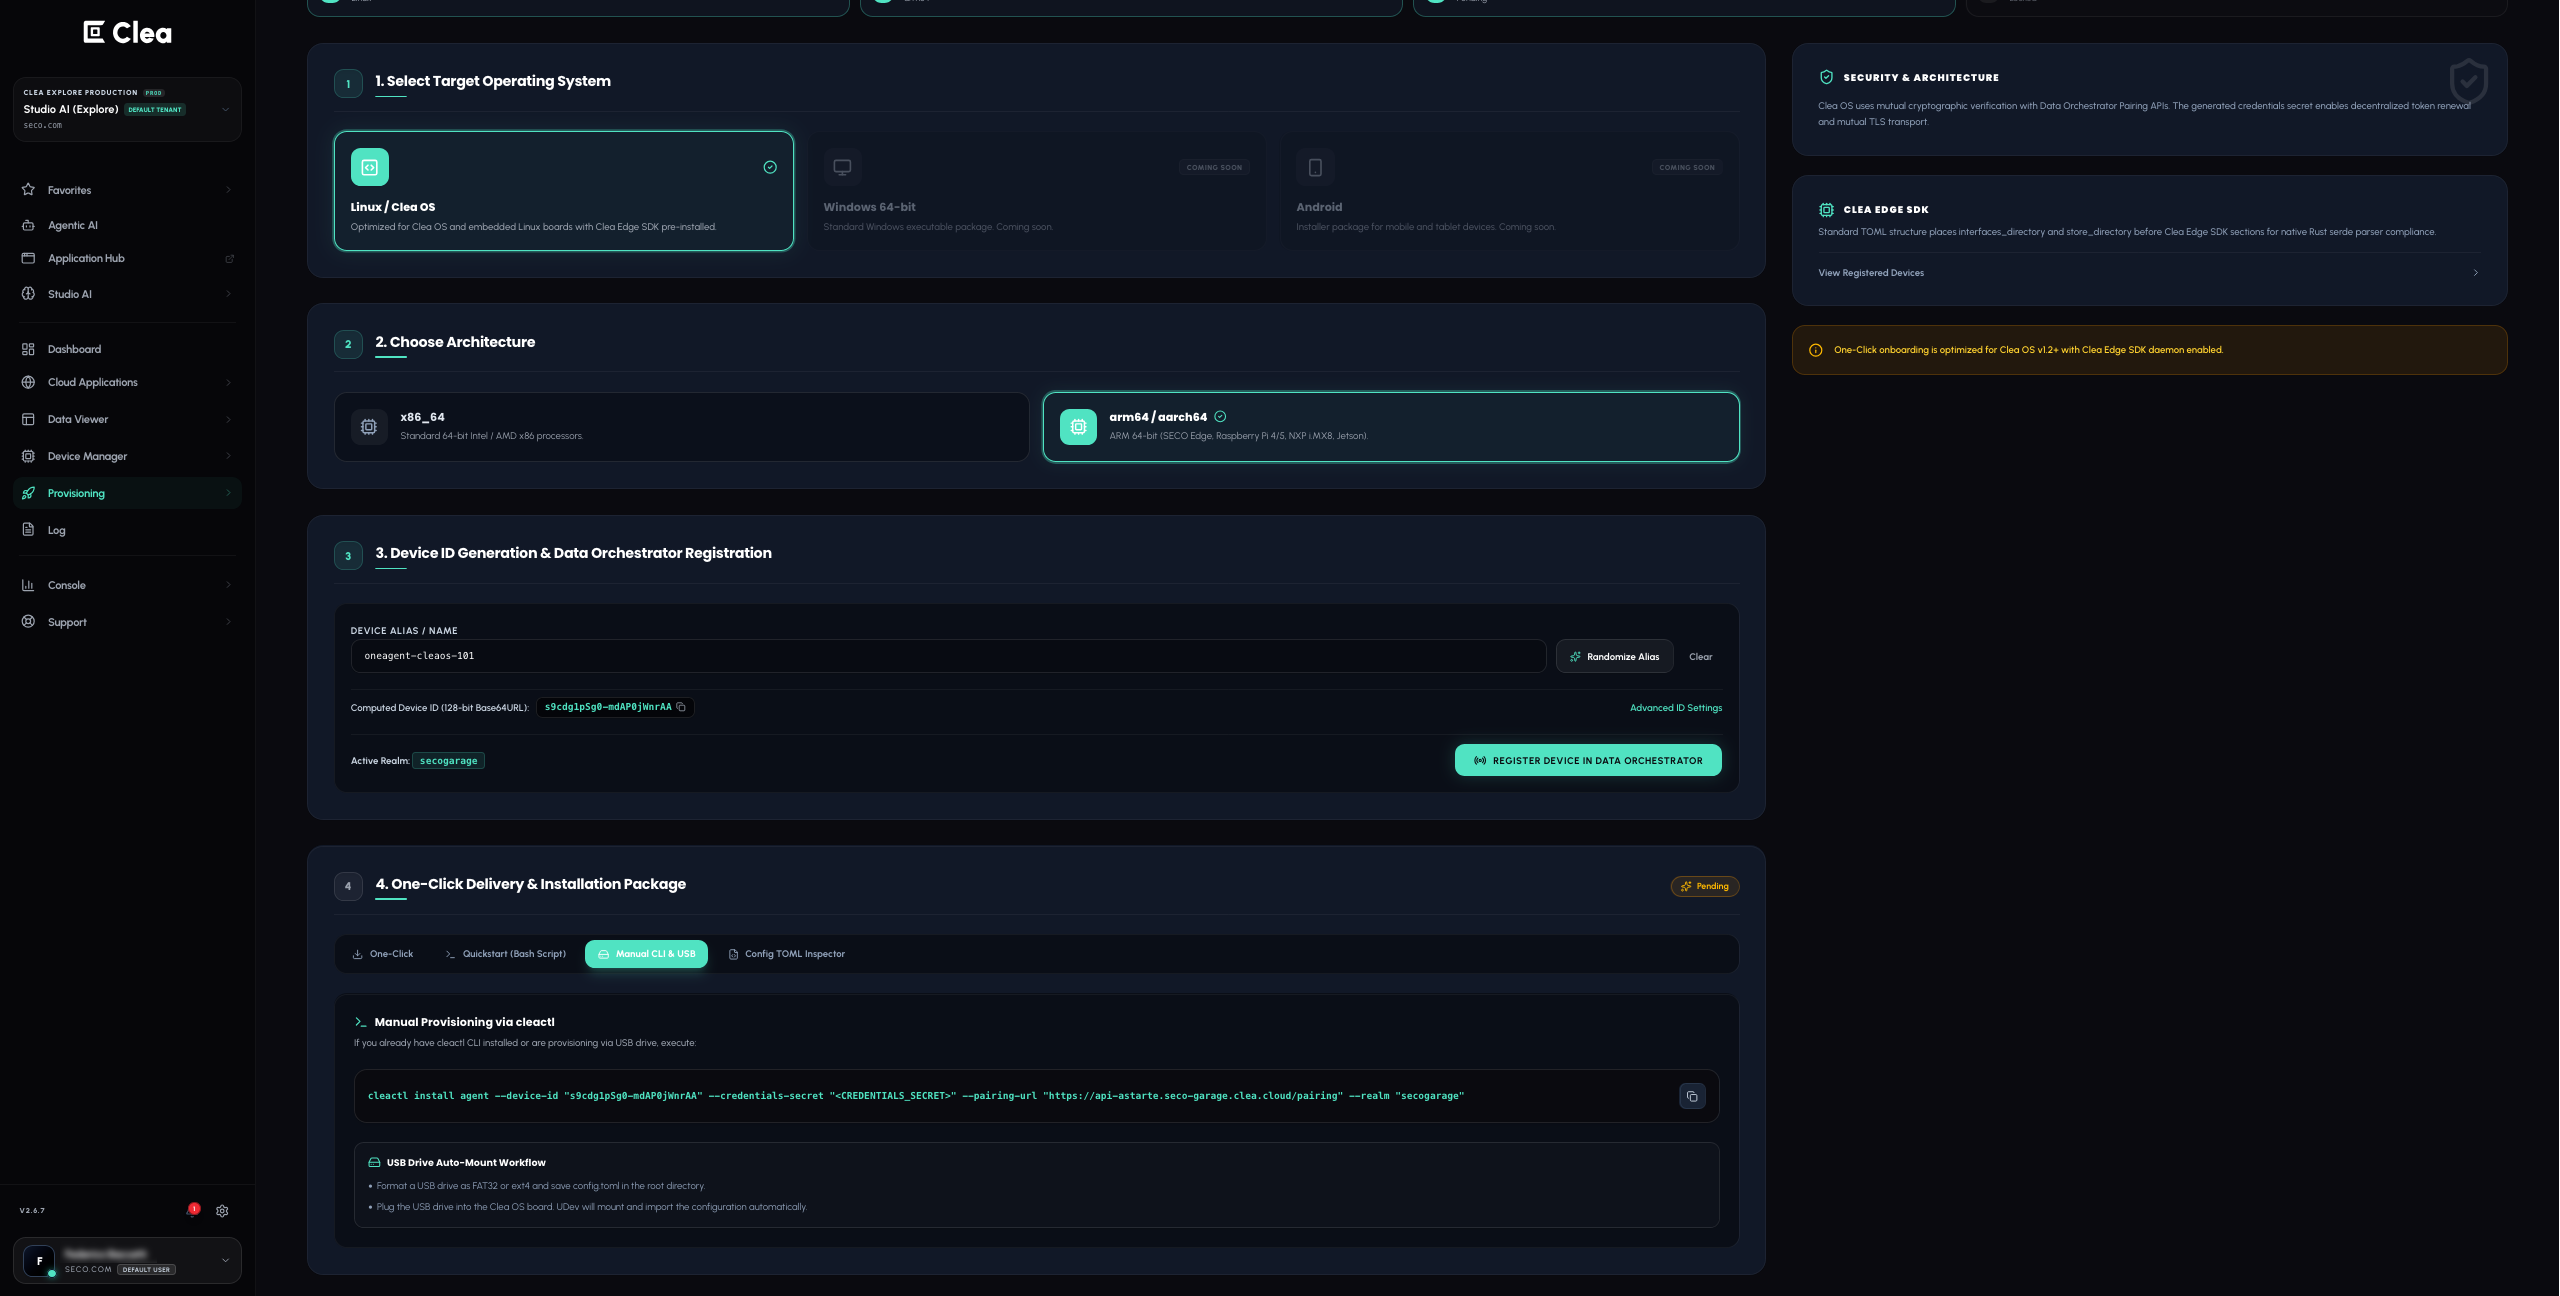
- In Bundle & Install, select Manual CLI.
- Copy the command generated for your registered device.
- Open a terminal on the target device.
- Paste and execute the command, following any instructions provided by the tool.
- Return to Device Manager and check the device connection status.
Prerequisite: This method requires cleactl to be installed on the device. If cleactl is not available, use Quickstart or another provisioning method suitable for your system.
5. Connect a headless device
A headless device can be configured without opening Clea 2.0 on the board itself. For example, you can connect a SECO evaluation board through its serial console or over the network.
- Connect the device to power and a network with internet access.
- From your development computer, access the device using its serial console or SSH, if SSH is enabled and you know the device's network address and credentials. Refer to the board's hardware and software documentation for the required connection settings.
- From your computer's browser, sign in to Clea 2.0 and open Provisioning > One Agent.
- Select the target Linux architecture, name the device, and complete registration.
- Select Quickstart, then copy the generated command and execute it in the terminal session connected to the device.
- Check the installation output and return to Device Manager to confirm that the device is Online.
For a Clea OS board that supports USB configuration import, you can instead transfer config.toml using the USB method. If you need to edit the connection settings directly, follow the manual configuration guide.
If you connect a display and can open Clea 2.0 on the board itself, you may use the direct configuration download method.
6. Connect your own Linux device without Clea OS
You can also register a compatible Linux device that does not run Clea OS. In this case, you must install and configure an appropriate One Agent runtime, because the Clea OS automatic configuration service is not part of a standard Linux installation.
- Connect the Linux device to the internet and make sure you have terminal access.
- Sign in to Clea 2.0 from a browser and open Provisioning > One Agent.
- Select Linux and the target architecture, arm64 / aarch64 or x86_64.
- Enter a device alias and register the device.
- Under Bundle & Install, use the Quickstart command or installation bundle provided for your target operating system.
- Execute the installation instructions on the Linux device, and complete any required configuration.
- Open Device Manager and check that the device is Online.
Note: The manual configuration guide applies to Clea OS and is not a general procedure for other Linux distributions. Use the installation package and instructions appropriate for your Linux environment.
7. Connect a Windows device without Clea OS
For a Windows 64-bit device, use Provisioning > One Agent to register it and obtain its provisioning instructions. Clea OS is not required for this route.
- Connect the Windows device to the internet.
- Sign in to Clea 2.0, either from the Windows device itself or from another computer.
- Open Provisioning > One Agent and select Windows 64-bit. The target architecture is x86_64.
- Enter a device alias, check the Computed Astarte Device ID, and select Register Device in Astarte.
- In Bundle & Install, copy the Windows-specific command provided for the registered device.
- On the Windows device you want to connect, open PowerShell.
- Paste the command into PowerShell and press Enter. Follow the instructions displayed in the shell.
- Return to Clea 2.0 and check that the device is Online in Device Manager.
Use the Windows command provided by the wizard for that device. Do not run the Linux installation command or Clea OS service-management commands in PowerShell. If your environment provides a Windows installation package instead of a command, follow the instructions supplied with that package.
8. Connect a device using manual configuration
Alternatively, you can connect a device running Clea OS by manually configuring its connection services instead of using the One Agent provisioning wizard. This method allows you to achieve the same result: a device connected to Clea 2.0 and visible as Online in Device Manager.
For the complete procedure, see How to connect a device to Clea Framework on the SECO Developer Center.
9. Verify that your device is online
After completing the selected provisioning method:
- Return to the Clea instance and tenant where you registered the device.
- Open Device Manager and find the device, using its Device ID or displayed name.
- Check the status. A successfully connected device is shown as Online. A device marked as Registered in One Agent has an identity in the platform but may not yet be connected.
- Open the device details. If the installed runtime provides system metrics, you may see basic information such as CPU or memory usage. Additional data depends on the interfaces and applications available on the device.
Your device is now connected to Clea 2.0. You can continue exploring device monitoring and management, data interfaces, and other services available in your instance.
Troubleshooting
| Issue | What to check |
|---|---|
| You cannot access your tenant | Make sure your Clea account is active and you have been granted access to the intended instance and tenant. |
| The operating system or architecture does not match your device | Check the operating system installed on the target device and the processor architecture in its product specifications. |
| The device is Registered but not Online | Check network connectivity and make sure the configuration or installation steps were completed on the physical device. |
Downloading config.toml does not connect the device | Make sure you downloaded it on the target Clea OS device and that its image includes automatic configuration import. |
| USB configuration import does not start | Check whether the image supports this method, whether config.toml is at the USB drive's root, and whether the drive uses a supported filesystem. |
| The Linux Quickstart command fails | Confirm the device is online, the command matches its architecture, and it is executed with the necessary permissions on the target system. |
The cleactl command is not found | Use Quickstart or install the compatible CLI according to your system's instructions. |
| The Windows device does not connect | Check that the Windows-specific command was executed on the target in PowerShell and review the installation output for errors. |
| The device is Online, but no telemetry appears | Check that the relevant runtime services and data interfaces are enabled. An online connection does not automatically generate application data. |
Security notes
Device registration credentials and downloaded configuration files can grant access to your Clea environment. Store them securely, use a separate registration for each device, and do not include live credentials in publicly shared logs or commands. If a credential is exposed, replace it using the device registration and credential-management process for your environment.