Create a UEFI-bootable USB Drive (UEFI Shell)
This guide shows how to create a UEFI-bootable USB drive that can launch the UEFI Shell.
Many SECO utilities (for example BIOS update tools) are provided as EFI applications, so having a bootable EFI USB stick is often required.
- UEFI is the firmware standard that boots the system.
- EFI commonly refers to the
.efiapplications and theEFI/folder on the USB drive (EFI System Partition layout).
Formatting a USB drive deletes its contents. Back up anything important before continuing.
What you need
- A USB flash drive
- A computer running Windows or Linux
- An EFI Shell bootloader folder (usually provided inside SECO BIOS/update packages as an
EFI/folder)
Step 1 — Format the USB drive as FAT32
UEFI expects the USB to contain a FAT32 partition in most scenarios.
Linux (GUI)
- Insert the USB drive.
- Open Disks (GNOME Disks) or your distribution’s disk utility.
- Select the USB drive from the list.
- Unmount it if it is mounted.
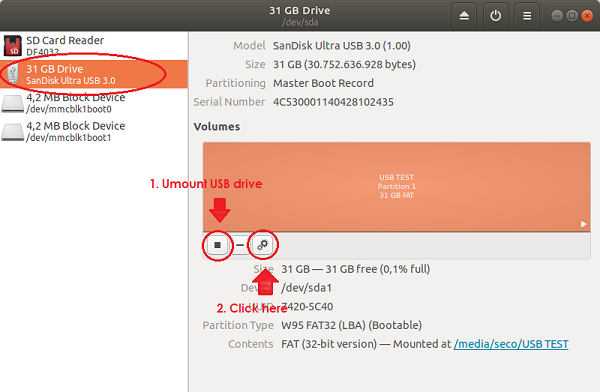
- Choose Format and set:
- Volume Name: any name you like
- Type: For use with all systems and devices (FAT) / FAT32
- Erase: optional (OFF is usually fine for speed)
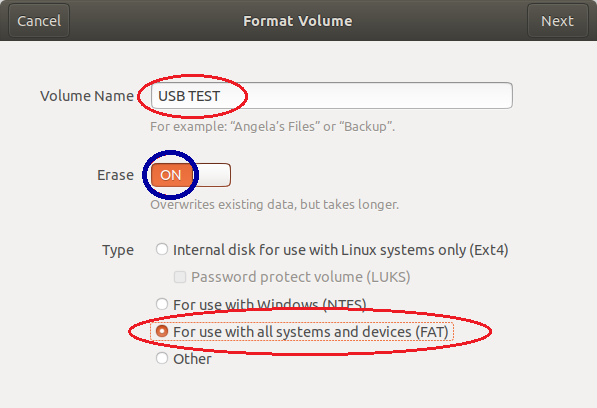 6. Confirm and start the format.
Windows (GUI)
- Insert the USB drive.
- In File Explorer, right‑click the USB drive → Format…
- Set:
- File system: FAT32
- Volume label: any name you like
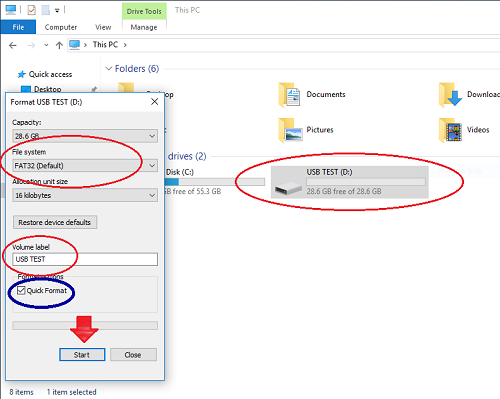
- Click Start and confirm.
Quick Format is faster and is usually enough for creating a bootable EFI USB. Full Format takes longer because it also checks for bad sectors.
Step 2 — Copy the EFI bootloader files
Inside SECO BIOS/update packages you typically find an EFI/ folder that contains the UEFI Shell bootloader.
- Open the downloaded SECO package and locate the
EFIfolder. - Copy the entire
EFIfolder to the root of the USB drive (top level). This provides the EFI bootloader that UEFI will load. You should end up with:
USB:/
└── EFI/
    └── Boot/
        └── Bootx64.efi
The most important file is
EFI/Boot/Bootx64.efi(the standard 64‑bit UEFI boot filename).
Step 3 — Boot from the USB and start UEFI Shell
- Insert the USB drive into the target device.
- Power on and enter BIOS setup (commonly ESC, but it can vary by platform).
- Open the Boot or Save & Exit menu and choose the USB device (often shown with a
UEFI:prefix). - The system should boot into the UEFI Shell (or a UEFI boot menu that allows selecting it).
Troubleshooting
The USB does not show up in the boot menu
- Confirm the USB is formatted as FAT32.
- Try a different USB port (a USB 2.0 port can be more reliable on some platforms).
- Recreate the structure and ensure
EFI/Boot/Bootx64.efiexists.
It boots, but not into the shell
- Verify you copied the whole
EFI/folder from the SECO package, not only a single file. - Ensure you are using a 64‑bit UEFI bootloader (
Bootx64.efi).
Linux: the disk utility refuses FAT32
- Some tools label it as FAT or MS-DOS (FAT); that’s fine as long as the result is a FAT32-formatted partition.
Windows: FAT32 is not available for large USB drives
- Some Windows versions hide FAT32 for very large drives in the GUI. Use a smaller USB stick (recommended), or format via a dedicated tool/
diskpartif your IT policy allows it.
What’s next?
Once your USB can boot into UEFI Shell, you can copy the SECO EFI utilities (and scripts) onto the same USB drive and run them from the shell.